
The Python SDK is the most popular way to use Ensign. In this module you will write some Python code to publish data to your project.
If you missed the first post of this series and want to learn how to create a free Ensign account and set up a new project, check that out here!
Step 1: Install PyEnsign
PyEnsign is the official Python SDK that allows you to publish and subscribe to data streams, as well as manage those streams. You can pip install it like any other Python package.
pip install pyensign
Note: PyEnsign is currently compatible with Python versions 3.9, 3.10, and 3.11
Step 2: Connecting to the Ensign Server
Writing and reading data from your topics will require an open connection to the Ensign server, otherwise known as a client. To create a PyEnsign client you need to provide the credentials to your project. This is where your API key comes in. If you don’t have an API key, you can create one in the Ensign dashboard. Remember that there are two components to the API key, the Client ID and Client Secret.
The recommended way to provide your credentials is to set them in the ENSIGN_CLIENT_ID and ENSIGN_CLIENT_SECRET environment variables. If you’re in a bash or shell-based terminal you can do the following:
$ export ENSIGN_CLIENT_ID=VgIimFHcluODgetZuApkfYrGiMFbyZkX
$ export ENSIGN_CLIENT_SECRET=1FFSRLP4giJcZkItam7anoADS2HQ9N97UQhbZq0JwJ5H8P98yADM84xZm2wHMr18
When you instantiate an Ensign client, your credentials will be retrieved from the environment by default.
> from pyensign.ensign import Ensign
> ensign = Ensign()
Alternatively, you can provide your credentials from a JSON file.
creds.json
{
    "ClientID": "VgIimFHcluODgetZuApkfYrGiMFbyZkX",
    "ClientSecret": "1FFSRLP4giJcZkItam7anoADS2HQ9N97UQhbZq0JwJ5H8P98yADM84xZm2wHMr18"
}
> ensign = Ensign(cred_path="creds.json")
If you’re in a dev environment, you can provide your credentials as keyword arguments. Note: This is not recommended in production code because it exposes your keys!
> ensign = Ensign(client_id="VgIimFHcluODgetZuApkfYrGiMFbyZkX", client_secret="1FFSRLP4giJcZkItam7anoADS2HQ9N97UQhbZq0JwJ5H8P98yADM84xZm2wHMr18")
Step 3: Using Your Client Connection
The PyEnsign client is asynchronous. This means that you can use your client connecting to read and write to your topics concurrently without having to worry about contention or managing multiple threads. However, it also means that you must use async/await syntax when calling the client methods. If you are unfamiliar with asyncio, I recommend checking out the documentation here.
Once you’ve created a client, make sure you have a topic to publish to. The get_topics() method will list the available topics in your project.
>> import asyncio
>>
>> async def main():
>>   print(await ensign.get_topics())
>>
>> asyncio.run(main())
[Topic(id=01HFT1FK687DSK7YSF3Q6WQYGT, name=my-topic, ), Topic(id=01HFT1FTNMAAD1B9DG8AB9V1ZD, name=my-other-topic, )]
Pro Tip: If you’re in a Python notebook (e.g. Jupyter) using await ensign.get_topics() should be sufficient.
If you don’t have any topics, you can create one from the project page on the Ensign dashboard or with ensign.create_topic().
Step 4: Hello World
Now that you have an authenticated client and a topic, you can start writing data to your project. In Ensign, data exists as an ordered sequence of serialized Events. Every event must have a binary payload (bytes in Python) and a mimetype indicating how the event data should be decoded. The most common encoding is JSON, but events can be anything — including pickle files, vectors, or just plain text.
The publish() method lets you publish one or more events to a topic. Try it out!
>> from pyensign.events import Event
>>
>> async def publish():
>>   hello = Event(b'{"Message": "Hello World"}', "application/json")
>>   otter = Event(b'{"Message": "You Otter Be Excited"}', "application/json")
>>   await ensign.publish("my-topic", hello, otter)
>>   await hello.wait_for_ack()
>>   await otter.wait_for_ack()
>>
>> asyncio.run(publish())
Pro Tip: wait_for_ack() will block until Ensign acknowledges the event. After that point, the Event is guaranteed to be published into your topic.
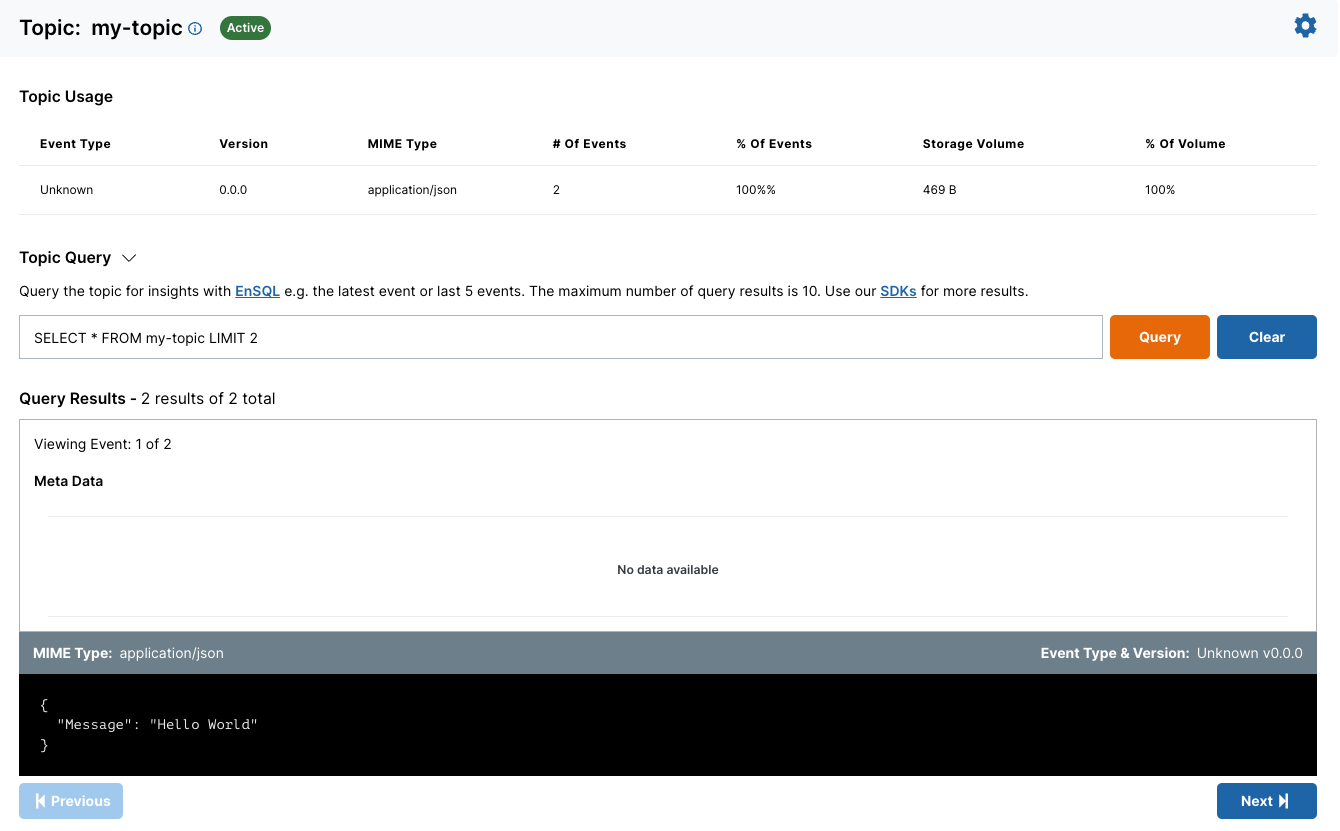
If you navigate to your topic in the Ensign dashboard, you should see both events published to topic. You can also run an enSQL query to see the data that you just published.
To be continued…
In the next module, you’ll learn how to create useful data flows with multiple topics to solve a real-world problem.