If you want to protect your IP or avoid vendor lock, you may find that building your own LLM is more practical than relying on services like ChatGPT. In this post, you’ll train a custom LLM using your own data!
This is part two in the DIY LLM series, so check out part one if you haven’t already.
Structure of an LLM
LLMs are large neural networks, usually with billions of parameters. The transformer architecture is crucial for understanding how they work.
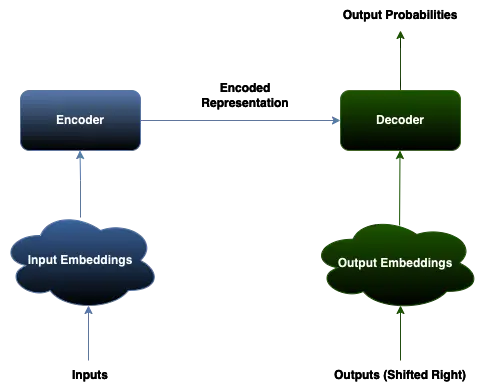
Encoder
The encoder is composed of many neural network layers that create an abstracted representation of the input. The key to this is the self-attention mechanism, which takes into consideration the surrounding context of each input embedding. This helps the model learn meaningful relationships between the inputs in relation to the context. For example, when processing natural language individual words can have different meanings depending on the other words in the sentence.
Decoder
The decoder is responsible for generating an output sequence based on an input sequence. During training, the decoder gets better at doing this by taking a guess at what the next element in the sequence should be, using the contextual embeddings from the encoder. This involves shifting or masking the outputs so that the decoder can learn from the surrounding context. For NLP tasks, specific words are masked out and the decoder learns to fill in those words. The decoder outputs a probability distribution for each possible word. For inference, the output tokens must be mapped back to the original input space for them to make sense.
Note that some models only an encoder (BERT, DistilBERT, RoBERTa), and other models only use a decoder (CTRL, GPT). Sequence-to-sequence models use both an encoder and decoder and more closely match the architecture above.
Training a domain-specific LLM
Training an LLM from scratch is intensive due to the data and compute requirements. However, the beauty of Transfer Learning is that we can utilize features that were trained previously as a starting point to train more custom models. More specifically, fine-tuning is the process of using a model that has been exhaustively pre-trained and continuing the training with a custom data set. Theoretically, we should be able to take a large pre-trained model like distilbert-base-uncased and train it on the movies dataset we ingested in part one. The goal is to train a model that:
- Better “understands” the domain of movie reviews.
- Has additional layers at the end to classify reviews as positive or negative.
Note: We’re using the uncased version of distilbert which treats cases the same (e.g. Ryan Gosling == ryan gosling). You can also try training from the cased version and see how it impacts the resulting model.
Prerequisites
Before coding, make sure that you have all the dependencies ready. We’ll need pyensign to load the dataset into memory for training, pytorch for the ML backend (you can also use something like tensorflow), and transformers to handle the training loop.
$ pip install "pyensign[ml]"
$ pip install "transformers[torch]"
$ pip install evaluate
$ pip install numpy
Preprocessing
At this point the movie reviews are raw text - they need to be tokenized and truncated to be compatible with DistilBERT’s input layers. We’ll write a preprocessing function and apply it over the entire dataset.
from pyensign.ensign import Ensign
from pyensign.ml.dataframe import DataFrame
from transformers import AutoTokenizer

# Load the DistilBERT tokenizer
tokenizer = AutoTokenizer.from_pretrained("distilbert-base-uncased")

def preprocess(samples):
    return tokenizer(samples["text"], truncation=True)

# Query dataset from the Ensign topic and preprocess all the tokens
# Include your Ensign API key credentials here
ensign = Ensign(
    client_id=<your client ID>,
    client_secret=<your client secret>
)
cursor = await ensign.query("SELECT * FROM movie-reviews-text")
df = await DataFrame.from_events(cursor)
df['tokens'] = df.apply(preprocess, axis=1)
Next we need a way to tell pytorch how to interact with our dataset. To do this we’ll create a custom class that indexes into the DataFrame to retrieve the data samples. Specifically we need to implement two methods, __len__() that returns the number of samples and __getitem__() that returns tokens and labels for each data sample.
from torch.utils.data import Dataset

class TokensDataset(Dataset):
    def __init__(self, dataframe):
        self.tokens = dataframe["tokens"]
        self.labels = dataframe["label"]

    def __len__(self):
        return len(self.tokens)

    def __getitem__(self, idx):
        return {
            "input_ids": self.tokens.iloc[idx]["input_ids"],
            "attention_mask": self.tokens.iloc[idx]["attention_mask"],
            "labels": self.labels.iloc[idx]
        }
The training loop
The transformers library abstracts a lot of the internals so we don’t have to write a training loop from scratch. We do have to specify a fair bit of configuration here.
- model: The base model to start training from,
distilbert-base-uncased - id2label/label2id: How to map the labels from numbers to positive/negative sentiment
- output_dir: Where to save results, so we don’t lose progress!
- train_dataset/eval_dataset: The train/test dataset splits we defined in part one
- tokenizer: The tokenizer we defined above
- data_collator: How batches of samples are created, here we also pad the reviews to a consistent length as the batches are created, instead of applying the padding on the entire dataset beforehand
- compute_metrics: How evaluation metrics are computed during training
import evaluate
import numpy as np
from transformers import TrainingArguments, Trainer
from transformers import DataCollatorWithPadding, AutoModelForSequenceClassification


data_collator = DataCollatorWithPadding(tokenizer=tokenizer)
accuracy = evaluate.load("accuracy")

def compute_metrics(eval_pred):
    predictions, labels = eval_pred
    predictions = np.argmax(predictions, axis=1)
    return accuracy.compute(predictions=predictions, references=labels)

id2label = {0: "negative", 1: "positive"}
label2id = {"negative": 0, "positive": 1}
model = AutoModelForSequenceClassification.from_pretrained(
    "distilbert-base-uncased",
    num_labels=2,
    id2label=id2label,
    label2id=label2id
)
training_args = TrainingArguments(
    output_dir="results",
    learning_rate=2e-5,
    per_device_train_batch_size=16,
    per_device_eval_batch_size=16,
    num_train_epochs=2,
    weight_decay=0.01,
    evaluation_strategy="epoch",
    save_strategy="epoch",
    load_best_model_at_end=True,
)
trainer = Trainer(
    model=model,
    args=training_args,
    train_dataset=TokensDataset(df[df["split"] == "train"]),
    eval_dataset=TokensDataset(df[df["split"] == "test"]),
    tokenizer=tokenizer,
    data_collator=data_collator,
    compute_metrics=compute_metrics
)
You may see a warning about weights not being initialized, but since we are literally adding a classification layer to the end of the model it makes sense. The weights will be learned during training!
trainer.train()

Depending on whether you’re training on a GPU and how many epochs you configured, training can take a while. LLMs are huge!
Evaluation
Time for the fun part - evaluate the custom model to see how much it learned. To do this you can load the last checkpoint of the model from disk. For me, it happened to be “results/checkpoint-3126”.
from transformers import pipeline
from transformers import AutoModelForSequenceClassification, AutoTokenizer

checkpoint = "results/checkpoint-3126"
model = AutoModelForSequenceClassification.from_pretrained(checkpoint)
tokenizer = AutoTokenizer.from_pretrained(checkpoint)
sent = pipeline("sentiment-analysis", model=model, tokenizer=tokenizer)
sent(["I hate this movie", "I love this movie"])
[{'label': 'negative', 'score': 0.9292513132095337},
 {'label': 'positive', 'score': 0.9976143836975098}]
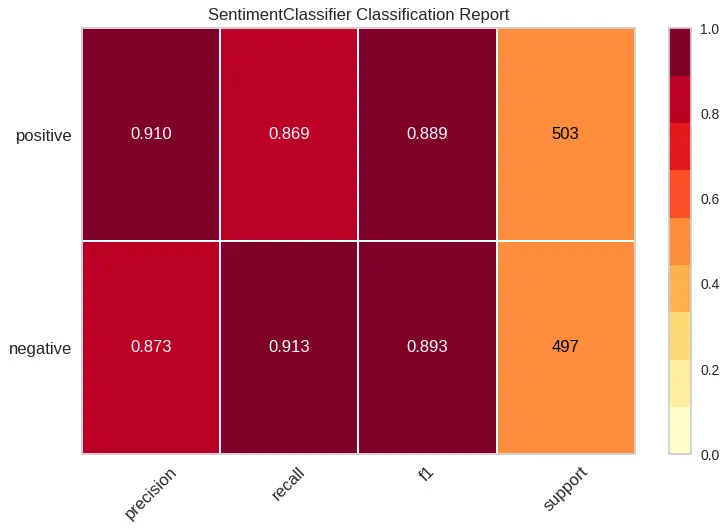
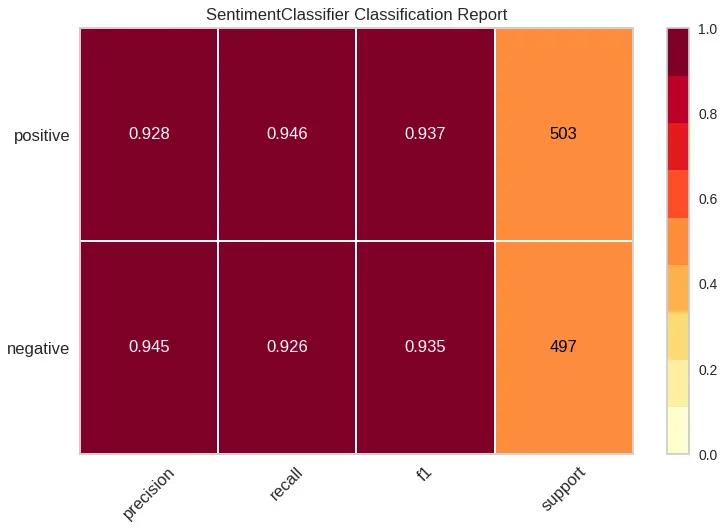
Promising sign, we didn’t completely break the model. One way to evaluate the model’s performance is to compare against a more generic baseline. For example, we would expect our custom model to perform better on a random sample of the test data than a more generic sentiment model like distilbert sst-2, which it does.
| DistilBERT base uncased finetuned SST-2 | Custom Sentiment Model |
|---|---|
 |  |
Of course, it’s much more interesting to run both models against out-of-sample reviews.
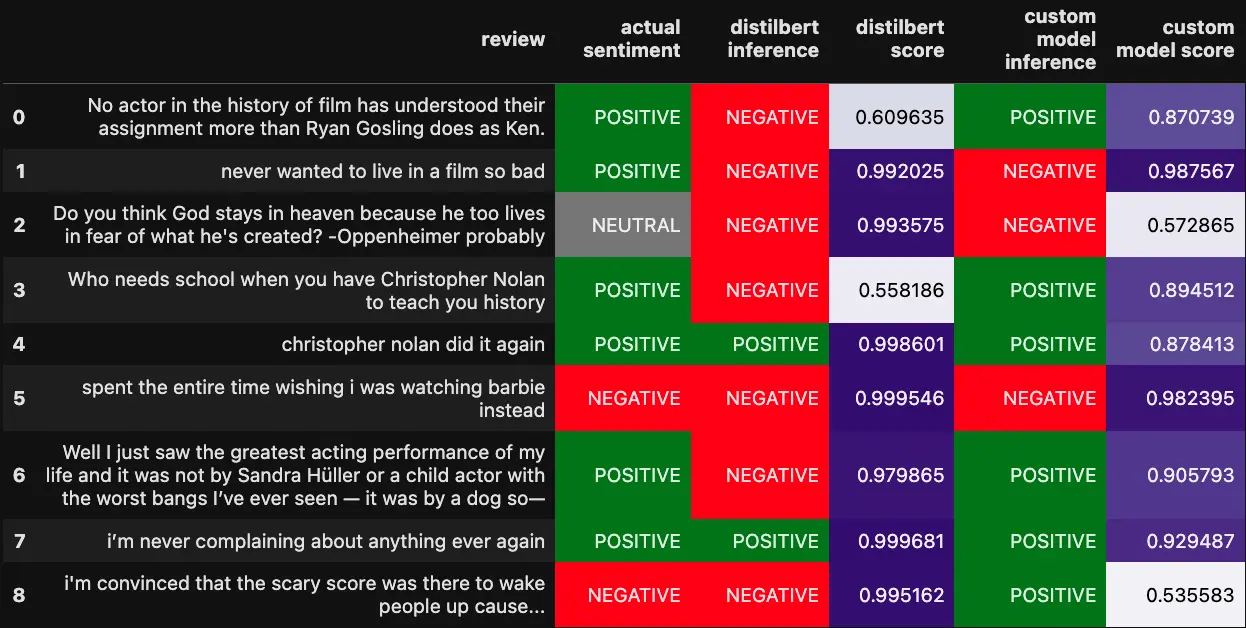
The custom model is a lot more accurate at rating the ambiguous reviews than the DistilBERT model. If we slightly modify one of the reviews (worst -> best) it’s clear that the DistilBERT model is more sensitive to the individual words in the text.
Well I just saw the greatest acting performance of my life and it was not by Sandra Hüller or a child actor with the worst bangs I’ve ever seen — it was by a dog so—
DistilBERT sentiment [{'label': 'NEGATIVE', 'score': 0.9798645973205566}]
Custom model sentiment [{'label': 'POSITIVE', 'score': 0.9057934284210205}]

Well I just saw the greatest acting performance of my life and it was not by Sandra Hüller or a child actor with the best bangs I’ve ever seen — it was by a dog so—
DistilBERT sentiment [{'label': 'NEGATIVE', 'score': 0.696468710899353}]
Custom model sentiment [{'label': 'POSITIVE', 'score': 0.9936215281486511}]
The trade-off is that the custom model is a lot less confident on average, perhaps that would improve if we trained for a few more epochs or expanded the training corpus.
To be continued…
Now you have a working custom language model, but what happens when you get more training data? In the next module you’ll create real-time infrastructure to train and evaluate the model over time.
Image generated by DALL-E


