

If you’re building LLMs but have no way to deploy them, are they even useful? In this post, you’ll deploy an LLM into a live production application!
This is part three in the DIY LLM series. Here’s a quick recap:
- In part one, you ingested a specialized data set into Ensign.
- In part two, you fine-tuned an LLM to predict the sentiment of movie reviews.
If you’re just looking for the code, it’s all available here.
Prerequisites
In this module we’ll be using the following python libraries.
$ pip install "pyensign[ml]"
$ pip install "transformers[torch]"
$ pip install evaluate
$ pip install numpy
$ pip install streamlit
The Architecture
Here is the application architecture. You can think of it as two separate workflows. The upper workflow is about training, where the LLM gets fine-tuned over time as more data becomes available. The lower workflow is about deployment, where the user interacts with the application in production.
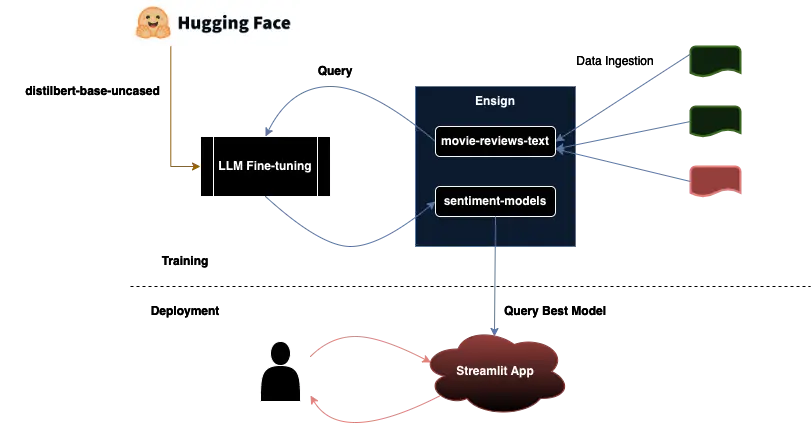
Trainer
The first aspect of this is the trainer. The idea is that the trainer can run asynchronously, allowing things to run smoothly in production while the model is being retrained. It’s helpful to structure this as a class that can be easily imported. At a minimum we probably want three class functions/coroutines:
load_dataset(): Load the dataset from Ensign in a consistent way for reproducible training.train(): Kick off a training run, checkpointing the results to disk.publish_latest_model(): Publish a model to dev or production.
The following snippet is a refactoring of part two.
import os
import json
import evaluate
import numpy as np
from pyensign.events import Event
from pyensign.ensign import Ensign
from transformers import TrainingArguments, Trainer, AutoTokenizer, DataCollatorWithPadding, AutoModelForSequenceClassification, pipeline

from dataset import DataFrameSet, EnsignLoader

class Trainer:
    """
    Class for training a model with the transformers library and PyTorch.
    """

    def __init__(
        self,
        model_topic="sentiment-models",
        ensign_client_id=None,
        ensign_client_secret=None,
        tokenizer="distilbert-base-uncased",
        model="distilbert-base-uncased",
        eval_metric="accuracy",
        output_dir="results",
        num_epochs=2,
        version="v0.1.0"
    ):
        if isinstance(tokenizer, str):
            self.tokenizer = AutoTokenizer.from_pretrained(tokenizer)
        else:
            self.tokenizer = tokenizer
        self.data_collator = DataCollatorWithPadding(tokenizer=self.tokenizer)
        self.accuracy = evaluate.load(eval_metric)
        id2label = {0: "negative", 1: "positive"}
        label2id = {"negative": 0, "positive": 1}
        self.model = AutoModelForSequenceClassification.from_pretrained(
            model,
            num_labels=2,
            id2label=id2label,
            label2id=label2id
        )
        self.output_dir = output_dir
        self.model_topic = model_topic
        self.train_args = {
            "output_dir": self.output_dir,
            "learning_rate": 2e-5,
            "per_device_train_batch_size": 16,
            "per_device_eval_batch_size": 16,
            "num_train_epochs": num_epochs,
            "weight_decay": 0.01,
            "evaluation_strategy": "epoch",
            "save_strategy": "epoch",
            "load_best_model_at_end": True,
        }
        self.training_args = TrainingArguments(**self.train_args)
        self.ensign = Ensign(
            client_id=ensign_client_id,
            client_secret=ensign_client_secret
        )
        self.loader = EnsignLoader(self.ensign)
        self.train_set = None
        self.test_set = None
        self.trainer = None
        self.version = version

    def _compute_metrics(self, eval_pred):
        preds, labels = eval_pred
        preds = np.argmax(preds, axis=1)
        return self.accuracy.compute(predictions=preds, references=labels)

    async def load_dataset(self, topic):
        df = await self.loader.load_all(topic)
        self.train_set = DataFrameSet(
            df[df["split"] == "train"], tokenizer=self.tokenizer
        )
        self.test_set = DataFrameSet(
            df[df["split"] == "test"], tokenizer=self.tokenizer
        )
        self.train_set.preprocess()
        self.test_set.preprocess()

    def train(self):
        self.trainer = Trainer(
            model=self.model,
            args=self.training_args,
            train_dataset=self.train_set,
            eval_dataset=self.test_set,
            tokenizer=self.tokenizer,
            data_collator=self.data_collator,
            compute_metrics=self._compute_metrics
        )
        self.trainer.train()
We certainly have to push the model somewhere for it to be useful. HuggingFace has done a lot of work to make this easy - you just need to create an accout and an access key with write permissions. However, to do MLOps correctly you need to consider a few things:
- Versioning - You need a way to distinguish between models and specify which model to use.
- Provenance - You need to include sufficient metadata along with the models to remember how they were trained.
- Reproducibility - Is the model training process deterministic? Will you be able to reproduce inferences and evaluations of the model for debugging?
One solution to these problems is a well defined audit log. This is where Ensign comes in. With Ensign, you can create a topic to keep track of training runs and include as much detail as necessary. The class method below publishes the latest trained model to HuggingFace and also publishes some important model metadata to the sentiment-models Ensign topic.
    async def publish_latest_model(
        self,
        hub_username,
        hub_token,
        model_name="movie-reviews-sentiment",
        eval=True
    ):
        latest = None
        checkpoint = 0
        for name in os.listdir(self.output_dir):
            num = int(name.split("-")[-1])
            if num > checkpoint:
                checkpoint = num
                latest = name
        model_path = os.path.join(self.output_dir, latest)
        model = AutoModelForSequenceClassification.from_pretrained(model_path)

        hub_path = f"{hub_username}/{model_name}"
        data = {
            "model_host": "huggingface.co",
            "model_path": hub_path,
            "model_version": self.version,
            "training_args": self.train_args,
            "trained_at": os.path.getmtime(model_path)
        }
        if eval:
            sent = pipeline(
                "sentiment-analysis",
                model=model,
                tokenizer=self.tokenizer,
                truncation=True
            )
            preds = sent(self.test_set.features())
            labels = self.test_set.labels()
            data["eval_accuracy"] = self.accuracy.compute(
                predictions=preds,
                references=labels
            )
        event = Event(
            json.dumps(data).encode("utf-8"),
            mimetype="application/json",
            schema_name="transformer-model",
            schema_version=self.version,
        )

        model.push_to_hub(model_name, token=hub_token)
        self.tokenizer.push_to_hub
        await self.ensign.publish(self.model_topic, event)
With that, we’ve created a high-level API for training LLMs and pushing them into production!
from train import Trainer
trainer = Trainer(
    ensign_client_id=<Your Ensign Client ID>,
    ensign_client_secret=<Your Ensign Client Secret>
)
await trainer.load_dataset("movie-reviews-text")
trainer.train()
await trainer.publish_latest_model(
    <Your HuggingFace Username>,
    <Your HuggingFace Access Token>,
    eval=False
)
On the sentiment-models topic page, you can run the sample query to confirm that the model training event made it to Ensign.
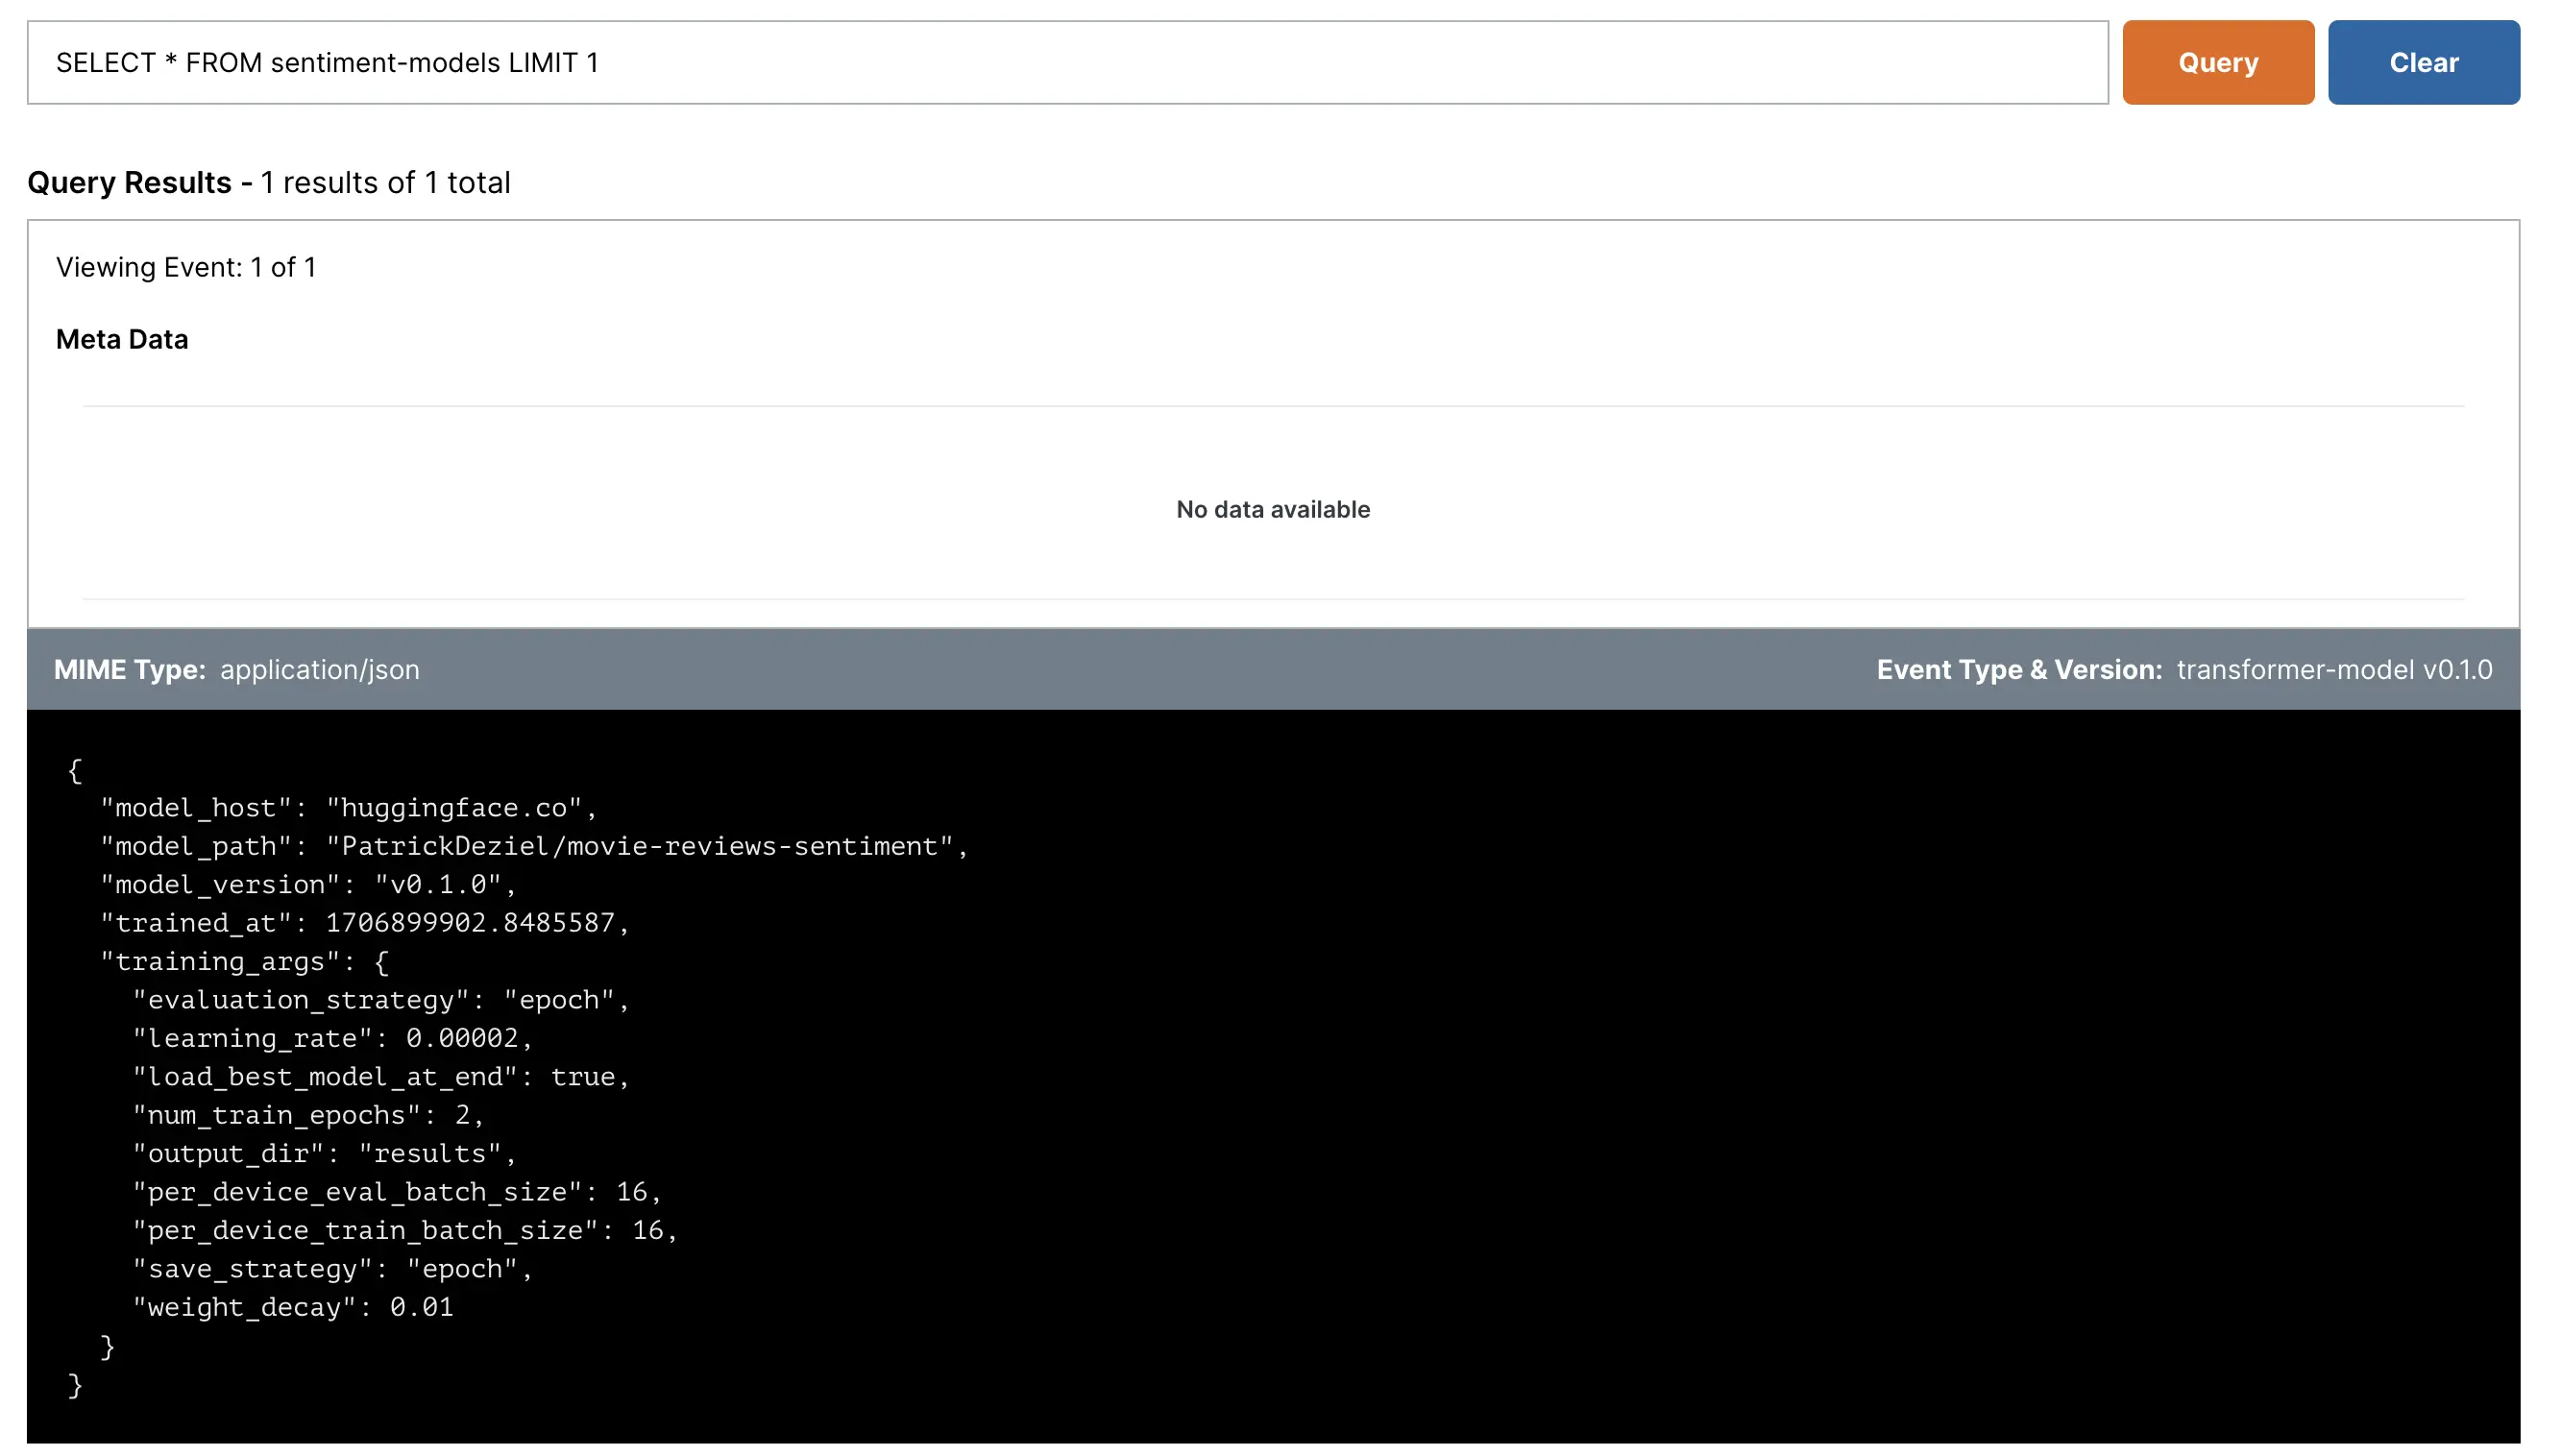
Now, it should be possible to for Ensign subscribers to read this event and know where to retrieve the model.
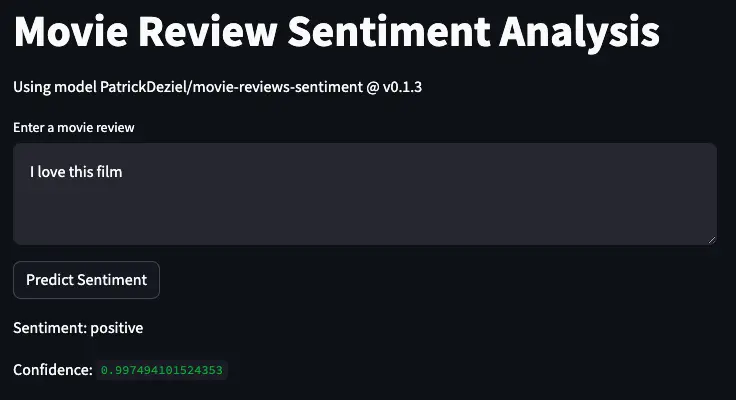
Production Application
You’ve done the hard engineering work to build the LLM. It’s about time to build the flashy demo! For building quick ML demos I personally like to use streamlit. We’ll create an app.py where the user can enter arbitrary reviews and score them.
import asyncio
import streamlit as st
from pyensign.ensign import Ensign
from pyensign.ml.dataframe import DataFrame
from transformers import pipeline, AutoTokenizer, AutoModelForSequenceClassification

def handle_input(sent):
    st.text_area("Enter a movie review", key="input")
    if st.button("Predict Sentiment"):
        input_text = st.session_state.input
        result = sent(input_text)
        st.write("Sentiment:", result[0]["label"])
        st.write("Confidence:", result[0]["score"])

async def app(ensign):
    st.title("Movie Review Sentiment Analysis")

    # Read the latest model from Ensign + Hugging Face
    query = "SELECT * FROM sentiment-models"
    cursor = await ensign.query(query)
    models = await DataFrame.from_events(cursor)
    model_path = models.iloc[-1]["model_path"]
    model_version = models.iloc[-1]["model_version"]
    st.write("Using model {} @ {}".format(model_path, model_version))

    # Build the pipeline to score raw text samples
    model = AutoModelForSequenceClassification.from_pretrained(
        model_path,
        revision=model_version
    )
    tokenizer = AutoTokenizer.from_pretrained(model_path, revision=model_version)
    sent = pipeline("sentiment-analysis", model=model, tokenizer=tokenizer)
    handle_input(sent)

if __name__ == "__main__":
    asyncio.run(app(Ensign())),
This app makes a query to Ensign to retrieve the latest model info and builds an inference pipeline for computing text sentiment. To run the app locally…
$ streamlit app.py
In order to deploy a new model for your application, just publish an Ensign event which points to it!
data = {
    "model_host": "huggingface.co",
    "model_path": "PatrickDeziel/movie-reviews-sentiment",
    "model_version": "v0.1.4"
}
event = Event(json.dumps(data).encode("utf-8"))
await ensign.publish("sentiment-models", event)
Finally, you can deploy your app to Streamlit Community Cloud following the directions here. You will need to create a GitHub repository that somewhat looks like this.
Congratulations
So now you’ve built a custom LLM and deployed it into production. Was it less more or less difficult than you originally imagined? Transfer learning can be a really efficient tool for wielding the power of open source LLMs for specific use cases in your organization. For your next machine learning project, building a custom domain model might make more sense than trying to wrap an API around pay-for-service models like ChatGPT.
Image generated by DALL-E